Wee-Things: Sleepy Node
Sleepy Node
In this tutorial we will learn how to configure our NodeMCU board so that it goes into deep-sleep mode. We will also read temperature and humidity values using a DHT11 sensor. We will put the sensor to deep sleep between readings to preserve battery life.
We will be using the dht module, which needs a custom build. You can check the full API in the NodeMCU wiki.
Intro
If you have a NodeMCU custom build, ensure the dht module was selected. Otherwise you will need a new build from the master branch with the following modules:
- DHT
- MQTT
The build service is pretty straight forward and easy to use. The only tricky part is dependency management, which due to a lack of guidance from NodeMCU.
We will be using the float build, so that the readings we get from the sensor have decimal values.
Once you have a build, flash the board with it, if you need instructions you can follow the intro tutorial
Source Code
init
We will be using an init.lua file like the one introduced in this tutorial, which explains why we want to keep it simple and why we have a small delay before executing our main routine.
print("Executing init.lua")

local BOOT_DELAY = 2000
local BOOT_FILE = "boot.lua"

print("starting delay to run "..BOOT_FILE)

tmr.alarm(0, BOOT_DELAY, 0, function()
    print("Stop alarm... dofile('"..BOOT_FILE.."')")
    tmr.stop(0)
    dofile(BOOT_FILE)
end)
WiFi
To establish the WiFi connection and monitor when the device gets an IP assigned we will use the wifi event monitoring facility.
The relevant code:
wifi.sta.eventMonReg(wifi.STA_GOTIP, function()
    on_connect_success()
end)

wifi.sta.eventMonStart()

--WiFi connection callback
function on_connect_success()
    print("Device IP: " .. wifi.sta.getip())
    wifi.sta.eventMonStop()
    -- unregister, need to pass "unreg"
    wifi.sta.eventMonReg(wifi.STA_GOTIP, "unreg")
end
By using this callback mechanism we avoid having to set a timer to check if the device has an IP, which is something you see in many tutorials out there.
This is partially due to eventMonReg being a new feature or not working properly in older builds of the firmware.
MQTT
MQTT is a lightweight IoT publish/subscribe messaging transport.
You will need a NodeMCU build that includes the mqtt module.
You need to have a valid MQTT broker to publish to and client to show the messages as they arrive to show your sensor's readings. We can use the mosquitto broker.
To do this locally, you could do it the right way and run it with docker, or you can be naughty and just brew it.
The commands you need to run if you have a local copy of mosquitto are:
To start the MQTT mosquitto broker, type the following command in a terminal window:
$ mosquitto
To start a client that shows the messages as they come in, type the following command in a terminal window:
$ mosquitto_sub -t things/ESP8266/dht
We are subscribing to the things/ESP8266/dht topic which then we will be publishing to from our lua program.
Then, inside your main Lua file, you need to instantiate the MQTT client:
m = mqtt.Client(mqtt_client_id, 120, mqtt_username, mqtt_password)
The 120 means a keep alive interval of 2 minutes, basically our client should publish a message before this interval ends.
We will connect our client instance and then, in the callback function, collect our payload and publish a message to the things/ESP8266/dht topic.
Once the message is
m:connect( mqtt_broker_ip , mqtt_broker_port, 0, function(conn)
    -- Get sensor data
    payload = get_sensor_data()

    m:publish("things/ESP8266/dht", payload, 0, 0, function(conn)
        print("Going to deep sleep for "..(time_between_sensor_readings/1000).." seconds")
        mqtt:close()
        node.dsleep(time_between_sensor_readings, 2)
    end)
end, function(conn, err)
    print("wop woop wop..."..err)
end)
Deep Sleep
We want to run this project out of a battery. To preserve some battery life we will try to minimize power consumption by reading sensor data every minute and putting our sensor to sleep between readings.
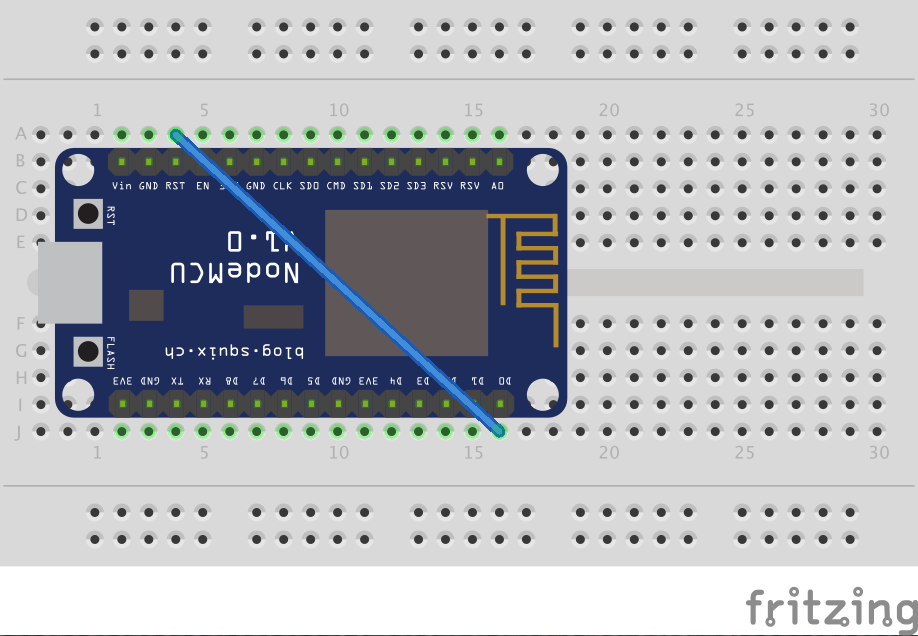
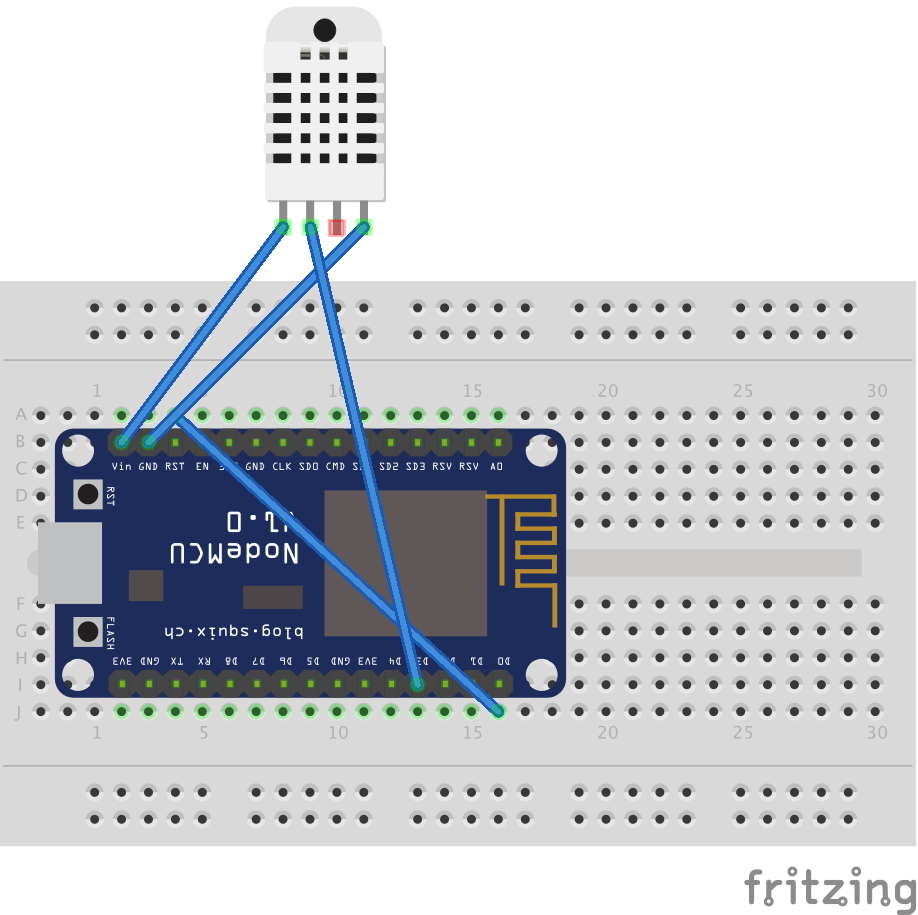
To be able to use the deep-sleep feature, we need to connect the RST pin to the D0 pin.

node.dsleep(time_between_sensor_readings, 2)
DHT11, DHTXX
We will use a DHT-11 humidity and temperature sensor, which thanks to the dht module we can interface with rather easily.
The wiring is rather simple, connect VCC and GND to the board, and then the out pin to D3.

The code we use to read from the sensor:
-- DHT22 sensor logic
function get_sensor_data()
    pin = 3
    status, t, h = dht.read11(pin)

    if status == dht.OK then
        temperature, humidity = t, h
        print("Temperature: "..temperature.." deg C")
        print("Humidity: "..humidity.."%")
    elseif status == dht.ERROR_CHECKSUM then
        print( "DHT-11 Checksum error." );
    elseif( status == dht.ERROR_TIMEOUT ) then
        print( "DHT-11 Time out." );
    end

    timestamp = rtctime.get()
    payload = '{"t":'..temperature..' , "h":'..humidity..', "id":'..node.chipid()..', "tp":'..timestamp..'}'

    return payload
end
