Wee-Things: Hello, WiFi!
Hello, WiFi!
In this tutorial we will learn how to configure our NodeMCU board to connect to the internet and also how to configure it as an Access Point so we can connect to it through a web browser.
We will be using the wifi module. You can check the full API in the NodeMCU wiki.
Intro
The NodeMCU firmware provides the wifi module to configure and manage... well, WiFi things.
Any NodeMCU board can function in three different modes:
- STATION: Connect to a router for internet connectivity. i.e.: Send POST request with sensor values to backend service.
- SOFTAP: Board reachable through IP- i.e. serve HTML page to configure WiFi credentials through browser.
- STATIONAP: Acts as both STATION and SOFTAP modes.
The API provides two submodules; sta, and ap. The sta submodule provides methods for the station functionality while the ap provides the Access Point functionality.
If our script needs to send data over the wire either by making HTTP requests- say to send sensor data to our backend- or to send/receive MQTT messages the board needs an internet connection. In this case we will use the STATION mode.
Let's say the script we are developing is collecting sensor data, say temperature values, and we want to store it in a service like ubidots, we need internet access to POST data to the service. We do so by setting the board WiFi mode to STATION and then you would use net module to send a POST request. We will show how in a later tutorial.
If we need to interact with our board, say by serving an HTML web page through which we send commands to the board or to provide configuration values, we will use the SOFTAP mode.
If we need to do both, we will configure the board to use the STATIONAP mode.
We will configure the board's WiFi mode as SOFTAP, this will create a local network to which we can connect using the browser.
wifi.setmode(wifi.SOFTAP)
The next step will be to configure the Access Point with the necessary credentials so that we can connect to the local network created by the device.
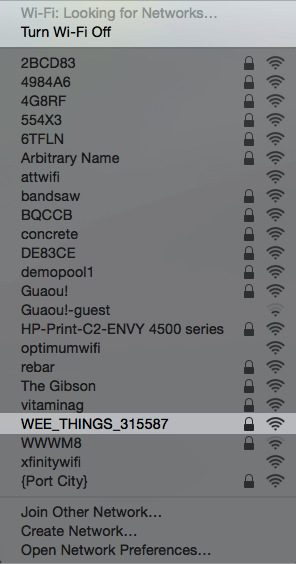
To give the local network a unique name, we are going to use the board's unique id, which we access using the node.chipid function. The network's name will look something like WEE_THINGS_315587, depending on the actual chip id of your board.
The password to connect to this network will be weething.
local cfg = {
    ssid = "WEE_THINGS_"..node.chipid(),
    pwd = "weething"
}
wifi.ap.config(cfg)
We then have to configure the IP address clients, like a web browser, will use to connect to the board:
local address = {
  ip = '192.168.4.1',
  netmask = '255.255.255.0',
  gateway = '192.168.4.1'
}
wifi.ap.setip(address)
If we load this code into the board, and we scan the local networks, we should be able to see the one we just created:

Source Code
The full source of the tutorial is below. You can upload it to the board using the esp cli tool, and execute the script using any of the techniques we introduced earlier.
Load the boot.lua file into the board:
$ esp file write boot.lua
If you the board was previously running you have to restart it to unload files from memory so that updates are picked up:
$ esp restart
Execute boot.lua:
$ esp file execute boot.lua
Monitor output using terminal:
$ esp monitor
boot.lua:
-- Initialize WiFi access point
wifi.setmode(wifi.SOFTAP)

-- Configure the access point
local cfg = {
    ssid = "WEE_THINGS_"..node.chipid(),
    pwd = "weething"
}
wifi.ap.config(cfg)

print('Wifi mode: ', wifi.getmode())
print('MAC: ', wifi.sta.getmac())
print('')
print('Created WiFi network:')
print('Network Name')
print('- SSID: ', cfg.ssid)
print('Security: WPA/WPA 2 Personal')
print('- PWD: ', cfg.pwd)
print('')

local address = {
  ip = '192.168.4.1',
  netmask = '255.255.255.0',
  gateway = '192.168.4.1'
}
wifi.ap.setip(address)

print('IP: ', wifi.ap.getip())
