Wee-Things: Button
Hello, Button!
In this tutorial we will use our NodeMCU board to react to a physical button.
We will combine this tutorial with Hello Blink and manage the state of an on-board LED. We will use a breadboard and a simple button switch.
We will also introduce how to write modules in Lua.
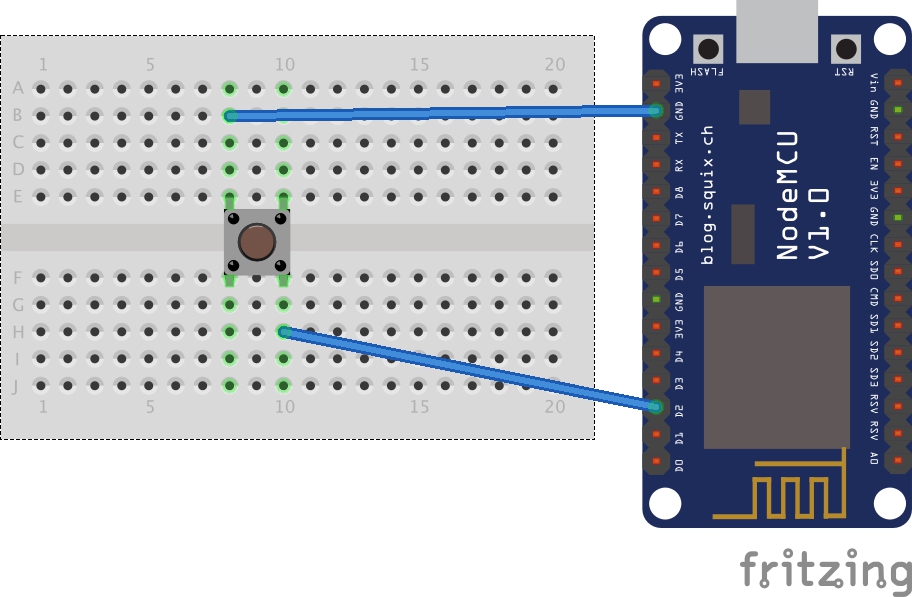
Wiring the Button
We use physical GPIO pins to interface with the things through code. We can listen for a button press as input, and use an LED as our output. To do so NodeMCU provides the gpio module.
Wiring the circuit is the next step. We will be two female/male extension jumper wires. Look for

Source Code
Is good practice to create self contained modules, and expose an object with an interface to interact with.
In Lua we can do this using a table, akin to an Object in JavaScript. We can attach functions to a table.
local App = {}

function App.start()

end

App.start();
Now we will add the code we need to run our program inside the App.start function.
local App = {}

function onpindown(level)
    print("Pin down", level)
end

function App.start()
    gpio.mode(2, gpio.INPUT, gpio.PULLUP)
    gpio.trig(2, 'both', onpindown)
end

App.start();
We use the gpio module to initialize pin #2 to act as input since we want to know about any button press.
gpio.mode(2, gpio.INPUT, gpio.PULLUP)
Any pin has three possible states: ON, OFF, and FLOATING. If we don't have anything connected to a pin and we try to read from it, then we will get random ON/OFF values, and we say it's floating.
You can read more about pull-up resistors here.
We use the third argument to gpio.PULLUP to drive the state of pin #2 to a known state/value. Then, when the button is pressed the input pin is pulled down. When the button is released the pin is pulled up.
Next, we use gpio.trig to register a callback function that will run when there is a change in the pin value.
gpio.trig(2, 'both', onpindown)
onpindown is a callback handler that gets called by the gpio module every time our button is pressed and released. It gets called with an argument that represents the GPIO pin's level; either 0 or 1.
We could adapt the code from our Hello, Blink! tutorial to control one of the board's LED.
local App = {}

function onpindown(level)
    print("Pin down", level)
    gpio.write(0, level)
end

function App.start()
    gpio.mode(0, gpio.OUTPUT)

    gpio.mode(2, gpio.INPUT, gpio.PULLUP)
    gpio.trig(2, 'both', onpindown)
end

App.start();
In App.start we set pin 0 to act as an output:
gpio.mode(0, gpio.OUTPUT)
Then, the onpindown callback will take the value read from the pin 2 and use it to set the value of pin 0:
gpio.write(LED, level)
Note that the gpio constants HIGH and LOW map to the values 1 and 0 respectively.
Now we will upload the new file, restart the board and execute the file, from terminal:
$ esp file write app.lua
$ esp restart
$ esp file execute app.lua
$ esp monitor
When you press the button, you should see the red LED (inconsistently) blinking and something similar to the following output in your terminal window:
Pin down	0
Pin down	1
Pin down	0
Pin down	1
Pin down	0
Pin down	1
Pin down	0
Pin down	0
Pin down	0
Pin down	0
Pin down	0
Pin down	1
Pin down	0
Pin down	1
Pin down	0
This does not work as expected. What you want to do is to get a reading of the pin in that moment. We can do so with the gpio.read function. Our updated program now looks like this:
local App = {}

function onpindown(level)
    print("Pin down level"..level, "Read value "..gpio.read(2))
    gpio.write(0, gpio.read(2))
end

function App.start()
    gpio.mode(0, gpio.OUTPUT)

    gpio.mode(2, gpio.INPUT, gpio.PULLUP)
    gpio.trig(2, 'both', onpindown)
end

App.start();
Now our program works as expected, and the button switches the LED on an off as we press it and release it.
